What the heck are object symbols? Who uses them? How do I make them? These are frequently asked questions I get. If you have never heard of object symbols or do not know much about them, do not worry! I am here to help. In this blog post, I will answer all these questions.
As always, I like to preface this with the following: I am not an SLP. I am a special education teacher with a passion for AAC. Always consult with your team SLP or ATP to determine if object symbols are the route for a specific student.
What are object symbols?
Object symbols, also referred to as tactile symbols, are a form of Augmented and Alternative Communication (AAC). They are concrete 3D objects that represent the item itself or something related to that item and are used for communication.
How do they work?
Depending on the student, object symbols can be presented in different fields and in different ways. For some students, you may work on presenting one object and directing eye gaze towards the object. Other students may work on reaching or grasping the object symbol when presented from a field of 2-3. Whereas, some students may be seeking out the object symbol independently. It is all student-specific. However, two things remain the same. 1) The object symbol is used to communicate. 2) model without expectation. Just like any other form of AAC, object symbols can be modeled throughout the classroom without expectation. Consistent exposure and reinforcement is key.
Remember that object symbols can represent exactly what they are or a more general idea within the same realm. For example, a cup may indicate a cup to drink out of, but it may also indicate snack time. The idea is to establish that items have meaning and can be used for communication.

How do I make them?
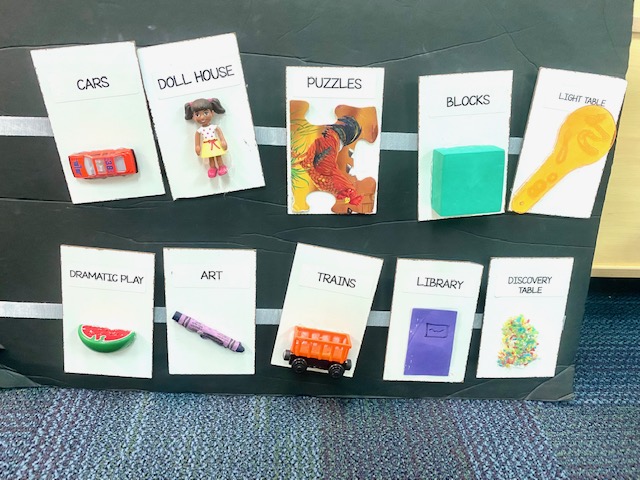
The simple answer is to just gather items you have around the classroom and use them. That’s it. The object itself is the symbol. For me, it made more sense to make them more durable since we use them so frequently. Here is how I made mine
- Determine the activities, items, or words you are trying to represent. Gather objects that will represent these things: a car for the car center, a doll table for table time, etc.
- You must get creative and think out of the box for some things, like a more obscure action or concept. For example, help. How do you convey that in an object? Well, for a typically developing student, we may ask them to raise a hand for help. When we help, we usually lend a “hand.” Many of the “help” symbols in AAC include a hand. Therefore, for help, we used a plastic hand from a clapping toy.
- Select a base to which you will adhere your object and cut it to size. Choose a lightweight material like a foam poster board. For extra durability, use wainscoting from your local hardware store. One thing I wish I had considered was using a black base for future CVI students, so keep that in mind.
- Adhere your object to the base with hot glue or Velcro.
- Add a label
- I like to add a label for two reasons. 1) to expose students to more environmental print and 2) so all service providers know exactly what the object means
To see me make object symbols in action click HERE!

How do I use them in the classroom?
Using and teaching object symbols is just like using or teaching any other form of AAC. It requires lots of modeling and modeling without expectation at that. Use them in the same way that you would use a core board or a high-tech device. It is important to not just use them for requesting/choice making because as we all know, that is not the sole purpose of communicating. In my classroom we use object symbols to represent different centers, common words like turn and help, as well as an entire object symbol visual schedule. They can be found in the bathroom, whole group, the table, and anywhere else you find AAC in the classroom.
